2016-12-30

Creating "Solaris patch" for testing with Spacewalk

Spacewalk is Linux systems management solution. Until some time ago it had support for Solaris clients as well, but that was removed recently. This needs some testing right?

In Solaris, you have 3 ways to deliver software (AFAICT - I have absolutely 0 knowledge about administering Solaris):

  • package - check OpenCSW project for some of these and if you wanted to push these to Spacewalk, you had to throw them to solaris2mpm utility which creates *.mpm package from these *.pkg.gz files. These *.mpm were then push-able to Spacewalk using rhnpush. When pushed, this package will appear in "Packages" tab of your Solaris channel.
  • Solaris patch - this is AFAICT something created by SUN (or Oracle) only and only distributed by them via payed subscriptions, I have not found any guide on how to create one yourself. Again, you need to use solaris2mpm to transform the file to push-able *.mpm file.
  • Solaris patch cluster - same as for Solaris patch

This post is about very lame way on how to create solaris patch file which after push appears under "Patches" tab in older Spacewalk in Solaris channel. There is absolutely no intention to have this actually installable by Solaris client.

  1. First of all notice solaris2mpm is broken in Spacewalk so use version from Satellite I have not reported it, as the functionality was actually removed anyway.
  2. Notice that solaris2mpm is present in normal fedora rhnpush package as well, but see this old bug about its missing dependencies
  3. Install heirloom-pkgtools from Spacewalk's build system. Although this build (direct link to rpm) is very old, it worked on mine Fedora 25
  4. Build aaa-1.pkg:
    $ pwd
    /tmp/solaris_yay
    $ cat pkginfo
    PKG=aaa-1
    NAME=Just a demo solaris patch
    VERSION=0.0.1
    CATEGORY=application
    DESC=Some loooong description of this cool package or patch or whatever
    ARCH=i386
    VENDOR=http://where.you.got.it
    EMAIL=root@ocalhost
    $ rm -rf aaa* README.*; P=aaa-1; mkdir $P; date > $P/data; echo "Date: $( date +%Y-%m-%d )" > README.$P; echo "Relevant Architectures: i386" >> README.$P
    $ (echo 'i pkginfo'; pkgproto /tmp/solaris_yay/README.aaa-1=/README.aaa-1 /tmp/solaris_yay/aaa-1=/) >prototype
    $ pkgmk -o -d /tmp/; echo $?; pkgtrans -s /tmp /tmp/aaa-1.pkg aaa-1; echo $?
    
    I have made these ugly lines because I have been experimenting a lot with that and it allowed me to kinda automate parts of the process
  5. Now on RHEL6 Satellite (so solaris2mpm works - see first point here) with heirloom-pkgtools package installed (see third point) (so you do not need to do this on Solaris machine) run:
    # solaris2mpm aaa-1.pkg
    Writing patch-solaris-aaa-1-1.i386-solaris-patch.mpm
    
  6. Push resulting *.mpm to the Spacewalk's/Satellite's Solaris channel using rhnpush and enjoy looking at "Patches" tab of the channel filled with some content without SUN/Oracle subscription.

Some links I have used along the way:

2016-10-16

Creating RHEL4 chroot on RHEL6

I needed to run some Python script (from package rhn-applet) which was lastly distributed for RHEL4. I have started with just extracting content of rpm packages, but that ended with kinda dependency hell.

mkdir mycontent
cd myconten
wget .../rhn-applet-2.1.29-4.el4.x86_64.rpm
rpm2cpio rhn-applet-2.1.29-4.el4.x86_64.rpm | cpio -idmv

Creating the chroot is quite easy (assuming you have yum repo rhel4-chroot.repo of RHEL4 packages available so yum, although RHEL6 version, can install these RHEL4 packages):

AFFAIR="rhel4-chroot"
ROOT="$( pwd )/$AFFAIR/"
mkdir $ROOT
rpm --root $ROOT --initdb   # this creates $ROOT/var/lib/rpm database
yum --disablerepo '*' --enablerepo $AFFAIR --installroot=$ROOT -y install rhn-applet   # install desired package from our repository to chroot and into RPM database from previous step
echo $( hostname -i ) $( hostname ) > $ROOT/etc/hosts   # script I run later needs to be able to connect to localhost

Now my chroot was behaving as I needed. One problem I had is that I had rpm database created by RHEL6 version of rpm there. That is bad, because it is unreadable for rpm present in RHEL4 and currently installed in the chroot.

# chroot $ROOT rpm -qa
rpmdb: /var/lib/rpm/Packages: unsupported hash version: 9
error: cannot open Packages index using db3 - Invalid argument (22)
error: cannot open Packages database in /var/lib/rpm
no packages

To fix it, you can follow these steps. Because I did not needed rpm database to be correct, only needed redhat-release package in there, I just reinstalled it with empty rpm database:

rm -rf $ROOT/var/lib/rpm/*
chroot $ROOT rpm --initdb   # create empty RHEL4 rpm formatted database
wget -P $ROOT http://repos.example.com/released/RHEL-4/U9/Desktop/x86_64/repo-Desktop-x86_64/RPMS/redhat-release-4Desktop-10.x86_64.rpm
chroot $ROOT rpm -ivh redhat-release-*.rpm --nodeps --justdb

2016-10-06

Total newbie guide for MicroPython on ESP8266

OK, disclaimer first. I know completely nothing about microelectronics. With that in mind:

Mine goal is to create cheep battery powered thermometer which would be reporting temperature in fixed intervals using http via mine home router WiFi network. This was occupying mine mind from this article (in czech only, executive summary: ESP8266 is old, new and better ESP32 is on the way). Till reading that article I did not knew there is cheep SoC which can connect to WiFi and you can read from external sensors attached to it (i.e. thermometer). There is lots of guides for this exact thing.

Purchasing ESP8266 ESP-01 and USB programmer

On E-Bay I have bought 3 ESP8266 Serial WIFI Wireless Transceiver Module Send Receive LWIP AP+STA for $9.44 (I have no idea on what all these letters in the name mean, but you want ESP8266 version labelled as ESP-01). And because I'm scared of wiring anything myself, I have bought ESP01 Programmer Adapter UART GPIO0 ESP-01 Adaptateur ESP8266 USB nb (to connect ESP8266 to computer via serial port emulated via USB; you do not need to install any drivers on Fedora 24). It took less than 20 days to receive all the items.

Lets use Python

I like Python, so was very surprised that there is a way how to program in it on ESP8266: MicroPython - a lean and efficient Python implementation for microcontrollers and constrained systems - especially MicroPython port for the WiFi modules based on Espressif ESP8266 chip.

To be able to build MicroPython, we need to build esp-open-sdk first.

Building toolchain: esp-open-sdk

esp-open-sdk if SDK for software development with the Espressif ESP8266 chips and at the end, it had 3.8GB on the disk and it contains some non-open-source binary blobs and I do not understand majority of the README, so I have decided to work with that as different user on my Fedora 24 system:

# dnf install autoconf gcc gcc-c++ gperf bison flex texinfo patch libtool ncurses-devel expat-devel pyserial help2man
# useradd esp
# sudo -u esp -i
$ git clone https://github.com/pfalcon/esp-open-sdk.git
$ cd esp-open-sdk/
$ make

I have taken this partly from Starting IoT development in Fedora (ESP8266), from Building and Running MicroPython on the ESP8266 (they are building in virtual machine here) and from esp8266/README.md in MicroPython git linked above.

Building MicroPython ESP8266 port

Now here we build binary image we will later upload to the chip.

$ git clone https://github.com/micropython/micropython.git
$ cd micropython/
$ git submodule update --init
$ make -C mpy-cross
$ export PATH=/home/esp/esp-open-sdk/xtensa-lx106-elf/bin:$PATH
$ cd esp8266/
$ make axtls
$ make

Flashing (uploading) MicroPython image to ESP8266

First try to talk to original firmware

Plug ESP8266 board into the UART-to-USB converter firmly and put it into USB port. Now you will see bunch of messages in journal (tail it with # journalctl -f). We need device name (that differs based on which USB port you will use). Now you can connect to serial console:

<date> <hostname> kernel: usb 3-1: new full-speed USB device number 6 using xhci_hcd
<date> <hostname> kernel: usb 3-1: New USB device found, idVendor=1a86, idProduct=7523
<date> <hostname> kernel: usb 3-1: New USB device strings: Mfr=0, Product=2, SerialNumber=0
<date> <hostname> kernel: usb 3-1: Product: USB2.0-Serial
<date> <hostname> kernel: ch341 3-1:1.0: ch341-uart converter detected
<date> <hostname> kernel: usb 3-1: ch341-uart converter now attached to ttyUSB0
<date> <hostname> mtp-probe[10120]: checking bus 3, device 6: "/sys/devices/pci0000:00/0000:00:14.0/usb3/3-1"
<date> <hostname> mtp-probe[10120]: bus: 3, device: 6 was not an MTP device
<date> <hostname> systemd-udevd[10119]: Process '/usr/bin/setfacl -m g:lirc:rw ' failed with exit code 2.
$ screen /dev/ttyUSB0 115200

This will fail because your "esp" user does not have write permissions to /dev/ttyUSB0. What I did was I have added "esp" user to "dialout" group with # usermod -a -G dialout esp, logged out, in again and verified that I have the group with $ groups command. Once done, start screen again.

You can try some AT commands - e.g. to switch to "station" mode and then listing available "access points" (your home WiFi network should be amongst them) as noted in Getting Started with ESP8266 article. Note that you need to press "Ctrl+M" (i.e. carriage return, "Enter" worked for me as well) and "Ctrl+J" (i.e. linefeed) to submit each command.

AT+GMR
AT version:0.25.0.0(Jun  5 2015 16:27:16)
SDK version:1.1.1
Ai-Thinker Technology Co. Ltd.
Jun  5 2015 23:07:20

OK
AT+CWMODE=3

OK
AT+CWLAP
+CWLAP:(3,"Internet_80",-82,"5c:f4:ab:02:da:12",1)
+CWLAP:(3,"Stonehenge",-81,"48:5b:39:38:56:56",6)
+CWLAP:(3,"krakonos",-67,"10:c3:7b:d6:b8:34",10)

OK

Once done, to terminate screen, use "Ctrl+a \".

To get some detail on current serial port setup (mostly baud rate is important), use $ stty < /dev/ttyUSB0.

Upload new firmware

First you need to start into flashing mode - to do that you need to wire GPIO 0 to GND before pushing into USB port. If your USB-to-UART converter do not have any switch or so, you need to be creative. For me, one small wire squeezed between these two pins made the trick - see the photo :-)

No erase current flash content and upload yours (took me few tries to actually upload correct file, so make sure you are uploading build/firmware-combined.bin). It all takes below minute:

$ esptool.py -p /dev/ttyUSB0 -b 115200 erase_flash
$ esptool -p /dev/ttyUSB0 --baud 115200 write_flash --flash_size=8m --verify 0 build/firmware-combined.bin

So I have Python on that tiny chip now?

Remove whatever you have used to start in flashing mode and plug it in again to start in normal mode. Again, use screen to connect. Press "Enter" and say wow, familiar >>> is here!

>>> print("Hello world")
Hello world
>>> print(sys.version)
3.4.0
>>> print(sys.implementation)
(name='micropython', version=(1, 8, 4))
>>> print(sys.platform)
esp8266

Next step would be to learn how to access wifi in MicroPython.

2016-08-02

Recovering RHEL in emergency mode in AWS EC2

OK. I'm sure everybody knows that, but I did not. When you have AWS EC2 instance, say c3.8xlarge, you will get 2 x 320 GB SSD storage. Thats nice, isn't it? But, besides you have to manually attach that storage when launching the machine (4. Add Storage -> Add New Volume -> Volume Type: Instance Store 0 and repeat for Instance Store 1), it gets purged every time you stop and start your instance. I did not knew that so I have created LVM on these and added physical volume to the /etc/fstab to be auto mounted on next boot:

# pvcreate --yes /dev/xvdb
# pvcreate --yes /dev/xvdc
# vgcreate mygroup /dev/xvdb /dev/xvdc
# lvcreate --size 1GB --name myvol mygroup
# echo "/dev/mapper/mygroup-myvol /mnt/test xfs defaults 0 0" >>/etc/fstab

Now, here comes the problem: on instance stop and start, RHEL notices there is now no logical volume and skips into emergency mode? Now what? Let's recover using second machine. Executive summary:

  1. Take some working machine
  2. Detach root device volume from broken machine
  3. Attach it to working machine
  4. From the working machine mount, fix fstab and umount
  5. Detach
  6. Attach (do not ask me why, but as a Device, I had to use /dev/sda1 instead of /dev/sda)

Because mine broken and working machines were created from same RHEL 7.2 image, when I have attempted to mount I got this:

# mount /dev/xvdf2 /mnt/tmp/
mount: wrong fs type, bad option, bad superblock on /dev/xvdf2,
       missing codepage or helper program, or other error

       In some cases useful info is found in syslog - try
       dmesg | tail or so.
# dmesg | tail
[  265.755327] SELinux: initialized (dev tmpfs, type tmpfs), uses transition SIDs
[  288.106763] SELinux: initialized (dev tmpfs, type tmpfs), uses transition SIDs
[  568.495065] Adjusting xen more than 11% (9437184 vs 9311354)
[  583.752252] blkfront: xvdf: barrier or flush: disabled; persistent grants: disabled; indirect descriptors: enabled;
[  583.766118]  xvdf: xvdf1 xvdf2
[  662.933196] XFS (xvdf2): Filesystem has duplicate UUID 379de64d-ea11-4f5b-ae6a-0aa50ff7b24d - can't mount
[  752.706161] XFS (xvdf2): Filesystem has duplicate UUID 379de64d-ea11-4f5b-ae6a-0aa50ff7b24d - can't mount
[  842.806648] XFS (xvdf2): Filesystem has duplicate UUID 379de64d-ea11-4f5b-ae6a-0aa50ff7b24d - can't mount
[  879.618806] XFS (xvdf): Invalid superblock magic number
[  884.951716] XFS (xvdf2): Filesystem has duplicate UUID 379de64d-ea11-4f5b-ae6a-0aa50ff7b24d - can't mount

So I had to mount with -o nouuid option.

2016-07-28

Enabling 10Gb networking on RHEL7 in AWS cloud (some instances types)

Even when you order recent RHEL 7.2 in some beefy Amazon EC2 instance type (like "c4.8xlarge") which have "enhanced networking capabilities", you still have to do some manual steps described in Amazon's docs (note there are actually two ways - based on the instance type you will choose). Basically you need newer network driver than what is in default installation. First check your current driver:

We would like to have "ixgbevf" here:

# ethtool -i eth0 | grep '^driver'
driver: vif

And here we would like to have at least "2.14.2" (ignore my actual version):

# modinfo ixgbevf | grep '^version'
version:        2.12.1-k-rh7.3

So lets go on (as root on the instance) - we will take newest version in Intel Ethernet Drivers and Utilities:

curl -o ixgbevf-3.2.2.tar.gz 'http://netcologne.dl.sourceforge.net/project/e1000/ixgbevf%20stable/3.2.2/ixgbevf-3.2.2.tar.gz'   # URL might be different for you, follow the download button on the SourceForge site
yum -y install kernel-devel gcc rpm-build   # we will need these to compile
rpmbuild -tb ixgbevf-3.2.2.tar.gz   # specfile is inside of the tarball
rpm -ivh /root/rpmbuild/RPMS/x86_64/ixgbevf-3.2.2-1.x86_64.rpm   # install resulting rpm
cp /boot/initramfs-$(uname -r).img /boot/initramfs-$(uname -r).img.$(date +%m-%d-%H%M%S).ORIG   # backup current initrd
dracut -f -v   # rebuild initrd so it contains our module
shutdown -h now   # stop the instance

Now we will need to run one command via aws command line tool. If you do not have it installed, like me (I'm on Fedora 24), you can install it with:

mkdir aws
cd aws
virtualenv .
. bin/activate
pip install aws
aws configure

And now we can finally run the command which enables some fancy attribute for your instance (they say in the docs this can not be undone):

aws ec2 modify-instance-attribute --instance-id <instanceID> --sriov-net-support simple

Now start the instance. Warning: instance had different public IP (and DNS hostname) now in my case, so do not blindly attempt to connect to previous hostname. Lets check what we have on the system now:

# modinfo ixgbevf | grep '^version'
version:        3.2.2
# ethtool -i eth0 | grep -e '^driver' -e '^version'
driver: ixgbevf
version: 3.2.2

This looks good, although I have not tested real performance yet. Going to turn off that expensive machine now :-)

2016-06-29

Verify that a programme is communicating through proxy only

I had to verify, that a programme on a remote server is communicating through proxy only, while there were lots of other services on the server running (and communicating over the network). While I could watch proxy's (squid) logs, setup firewall to log access to and from certain hosts or use iftop. In my case these had various down-sides (e.g. iftop is more to track amount of traffic and I had to check that even the smallest packet wont bypass mine http proxy - even if you can pass filters mentioned below to iftop as well - see -f option). I have chosen tcpdump, and this post is to save exact command I have used:

tcpdump -i any "tcp and host not proxy.example.com and host not my-workstation.example.com and not ( dst localhost and src localhost ) and not ( dst $( hostname ) and src $( hostname ) )"
  • tcp says that I'm interested in TCP traffic only
  • host not proxy.example.com instructs tcpdump to ignore (should not log) any traffic to/from my proxy server
  • host not my-workstation.example.com asks tcpdump to ignore traffic to/from my workstation as I'm connected via ssh from there (it could be hardened to only ignore ssh traffic - port 22, but this is good enough for me)
  • not ( dst localhost and src localhost ) ignore traffic going from localhost to localhost (some other services on the system are talking to each other and I'm not interested in it)
  • not ( dst $( hostname ) and src $( hostname ) ) same as above, but some services are using my external IP for their internal discussions and again, I do not need to know about that

This way tcpdump only logs communication from/to parts of external world I'm interested about.

2016-06-02

Difference in Spacewalk's API and almost dirrect SQL performance

Imagine you want to get list of hosts registered to your Spacewalk, ideally with groups they are registered to and you want to do it repeatedly, so performance matters. Lets measure it.

I have Spacewalk 2.4 on a 2 CPU virtual system with 4 GB or RAM (Virtual, really? Not ideal for perf measurement, I know.) and I have created 1000 system profiles on it. There are 2 ways how to get the data out of the Server: command-line spacewalk-report inventory utility (needs to be run on a system running Spacewalk, queries directly the database) or system API (can be ran from anywhere, but data have to go from DB through spacewalk's Java stack and to XML which is then transferred to you over the network). API script to measure can look like this (well, this does not output obtained data):

#!/usr/bin/env python

import xmlrpclib
import time

server = xmlrpclib.Server('http://<fqdn>/rpc/api')
key = server.auth.login('<user>', '<pass>')
for i in range(100):
  before = time.time()
  systems = server.system.listUserSystems(key)
  for s in systems:
    detail = server.system.getNetwork(key, s['id'])
    groups = server.system.listGroups(key, s['id'])
  after = time.time()
  print "%s %s %s %s" % (len(systems), before, after, after-before)
server.auth.logout(key)

Here are mine results (averages from 100 repetitions performed directly after spacewalk-service restart):

method average duration note
spacewalk-report inventory 1.4 seconds Needs to run directly on Spacewalk
API with system.listUserSystems() only 0.9 seconds Provides systm ID and profile name only (does not equal to hostname)
API with system.listUserSystems() and system.getNetwork() 23.8 seconds Gives you IP and hostname
API with system.listUserSystems() and system.getDetails() 27.5 seconds Gives plenty of info, including hostname, but not groups
API with system.listUserSystems(), system.getNetwork() and system.listGroups() 52.4 seconds Finally, ths one gathers hostname and system groups

So, depends on what you want to achieve and how often do you want to run the script. Also, in API script case, you have to keep login (or logins when you need to run for multiple organizations) somewhere. Fortunatelly you can use read-only API user for this.

2016-05-27

Which processes have most open files and consumes most memmory?

For some testing, I wanted to watch number of open files by process and memory consumed (1) by all the processes (2) of same name to get some global overview. Graphing this over time is another exercise which can show trends.

E.g. following number of open files (includes all libraries loaded by a binary, opened sockets...) comes from freshly installed Spacewalk server from last evening and it is not surprising IMO:

# lsof | cut -d ' ' -f 1 | sort | uniq -c | sort -n | tail
    121 cobblerd
    121 sshd
    122 gdbus
    131 master
    264 gssproxy
    282 gmain
    344 tuned
   1256 httpd
   4390 postgres
  25432 java

And this is total memory per processes with same name from same server - again nothing unexpected:

# ps --no-headers -eo rss,comm >a; for comm in $( sed 's/^\s*[0-9]\+\s*\(.*\)$/\1/' a | sort -u ); do size=$( grep "\s$comm" a | sed 's/^\s*\([0-9]\+\)\s*.*$/\1/' | paste -sd+ - | bc ); echo "$size $comm"; done | sort -n | tail
16220 tuned
18104 beah-fwd-backen
18664 beah-srv
23544 firewalld
24432 cobblerd
26088 systemd
26176 beah-beaker-bac
71760 httpd
227900 postgres
1077956 java

BTW man ps says following about RSS (which is used above):

resident set size, the non-swapped physical memory that a task has used (in kiloBytes).

2016-05-16

Serializing one task in an ansible playbook

In my workflow, I'm running playbook on all hosts from mine inventory, but in the middle I need to execute one command on a different system (lets creatively call it "central server") for all hosts in the inventory. And whats bad, that command is not capable to run in parallel, so I need to serialize it a bit. Initial version which does not do any serialization was:

- hosts: all
  remote_user: root
  tasks:
    - name: "Configure something on host"
      command: ...
    - name: "Configure something on central server for each host"
      command:
        some_command --host "{{ ansible_fqdn }}"
      delegate_to: centralserver.example.com
    - name: "Configure something else on host"
      command: ...

But "some_command" can not run multiple times in parallel and I can not fix it, so this is first way I have used to serialize it (so it runs only once on the central server at any time):

- hosts: all
  remote_user: root
  tasks:
    - name: "Configure something on host"
      command: ...
- hosts: all
  remote_user: root
  serial: 1
  tasks:
    - name: "Configure something on central server for each host"
      command:
        some_command --host "{{ ansible_fqdn }}"
      delegate_to: centralserver.example.com
- hosts: all
  remote_user: root
  tasks:
    - name: "Configure something else on host"
      command: ...

So I have created 3 plays from previous 1 in my playbook where the middle one is serialized by "serial: 1" option. I have not used "forks: 1", because you can set this value only in ansible.cfg or on ansible-playbook command line.

Another way was to keep only one play in a playbook, run given task only once and iterate over whole inventory:

- hosts: all
  remote_user: root
  tasks:
    - name: "Configure something on host"
      command: ...
    - name: "Configure something on central server for each host"
      command:
        some_command --host "{{ item }}"
      with_items: groups['all']
      run_once: true
      delegate_to: centralserver.example.com
    - name: "Configure something else on host"
      command: ...

In my case I needed hostname, so in the command I have used hostvariable {{ hostvars[item]['ansible_fqdn'] }}.

2016-05-09

Running dockerd on VM so containers can be reached from other VMs

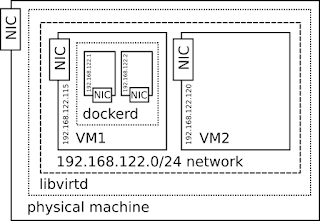
Recently I needed this kind of setup for some testing so wanted to share. This way, all your libvirt guests can talk directly to all your docker containers and vice versa. All nicely isolated on one system. All involved pieces are RHEL7.
Intentional schema of docker containers running in libvirt/KVM guest, all on one network
schema of docker containers running in libvirt/KVM guest, all on one network
It is not perfect (I'm weak at networking), so you can get IP assigned to your container by dockerd conflicting with some VM IP. This is because docker assigns IPs from defined range (sequentially) and VMs have random IPs from same range assigned by libvirtd. Also I have seen some disconnects from Docker VM when starting containers there and sshing to container from docker VM was also lagging.
Libvirt is just a default configuration with its default network.
On one of the guests I have installed Docker (on RHEL7 it is in rhel-7-server-extras-rpms repository) and changed it's configuration to use (to-be created) custom bridge:
[root@docker1 ~]# grep ^OPTIONS /etc/sysconfig/docker
OPTIONS='--selinux-enabled -b=bridge0'
As I already started Docker, I wanted to remove it's default docker0 bridge it created, so simply:
[root@docker1 ~]# ip link set docker0 down   # first bring it down
[root@docker1 ~]# brctl delbr docker0   # delete it (brctl is in bridge-utils package)
Now to create new bridge which will get "public" IP (in a scope of libvirt's network) assigned:
[root@docker1 ~]# cat /etc/sysconfig/network-scripts/ifcfg-eth0 
DEVICE="eth0"
BRIDGE="bridge0"
HWADDR="52:54:00:13:76:b5"
ONBOOT="yes"
[root@docker1 ~]# cat /etc/sysconfig/network-scripts/ifcfg-bridge0 
DEVICE=bridge0
TYPE=Bridge
BOOTPROTO=dhcp
ONBOOT=yes
DELAY=0
[root@docker1 ~]# service network restart
[root@docker1 ~]# service docker restart
This way containers get IPs from same range virtual machines.

2016-05-06

Mirroring git repository and making it accessible via git://

I needed to make some existing git repository, where I can not change way it is served, accessible via git://... Took some googling, so here is the story:
First, install git-daemon package. For RHEL 7 package lives in RHEL Server Optional.

Second, start git daemon via systemd services. I was confused here, because git-daemon ships with git@.service file, which is template unit file, but it does not contain magic %i or %I placeholder.

# rpm -ql git-daemon | grep systemd
/usr/lib/systemd/system/git.socket
/usr/lib/systemd/system/git@.service

Fortunately I do not need to know things. Being able to find them is enough. Basically you have to start (and enable) git.socket and enable it in firewall.

Next, clone copy of the git repository. This one is easy, you just need to create RepoName.git directory in /var/lib/git/ (default - see git@.service file) owned by used nobody (as git daemon runs under that user by default - see service file):

# mkdir /var/lib/git/RepoName.git
# chown nobody:nobody /var/lib/git/RepoName.git
# runuser -u nobody /bin/bash
$ cd /var/lib/git/
$ git clone --bare https://gitservice.example.com/RepoName.git
$ touch RepoName.git/git-daemon-export-ok   # this marks repo as exportable by daemon

Optionally enable git's archive protocol to be used on a repo. Put following into RepoName.git/config:

[daemon]
        uploadarch = true

Last: make the bare repo updating itself periodically from the source. Looks like you can not do simple git fetch:

# runuser -u nobody -- crontab -e
@hourly cd /var/lib/git/RepoName.git; git fetch -q origin master:master

Update 2017-03-21: If it can happen that somebody could change past in the repo, it would be good add --force to the git fetch command you run in the cron so local branches are overwritten when there is some non-fast-forward change in the upstream repo.

$ git fetch origin master:master
From https://gitlab.cee.redhat.com/satellite5qe/RHN-Satellite
 ! [rejected]        master     -> master  (non-fast-forward)

Also added || echo "Fetch of RepoName.git failed" at the end of cron command so I'll be warned when repo fails to sync.

To test if it works, just clone that with git clone git://gitmirror.example.com/RepoName.git.

2016-05-04

Repeat command untill it passes in ansible playbook

Found numerous solutions, but they did not worked for me. Maybe it changed in Ansible 2.0 (I'm on ansible-2.0.1.0-2.el7). So here is what worked for me.
I needed to repeat package installation command until it passes (i.e. returns exit code 0; it was failing because of extreme conditions with memory allocation issues):
    - name: "Install katello-agent"
      action:
        yum
          name=katello-agent
          state=latest
      register: installed
      until: "{{ installed.rc }} == 0"
      retries: 10
      delay: 10
Note that although action: might look like something used only in old Ansible versions, it seems to be current way to do this do-until loops.